The State of DIY Cloud Gaming
The idea of Cloud Gaming started out as this elusive goal, always a step away from being ready. The draw being, you don’t need to buy an expensive desktop computer housing an equally (if not more) expensive graphics card. You could game on your console, laptop, or even smartphone while the game runs on a very powerful computer in a datacenter located in the cloud.
That goal is no longer elusive though, now, there are several Cloud Gaming services that allow you to do this. The first time I came across this technology was through a service called OnLive they were one of the first, if not the first, Cloud Gaming companies.
What if you wanted to set this up yourself though? I have developed a couple of methods for doing this which I’ll walk you through, as well as some ideas for the future of DIY Cloud Gaming.
Method One: Parsec Cloud Gaming
Parsec is not a Cloud Gaming service like the others, it’s much more. It’s a piece of software that allows low latency remote desktop connections, it’s even more than this though.
My friend @kenjihasegawa would play 2-player local co-op games with me during quarantine, even though we were 40 miles apart, we were able to play local co-op. We’re big fans of the shmup genre, which we broadcasted playing on Twitch. How did we play locally even though we were separated so far apart, you ask?
When I started the Parsec server on my desktop and @kenjihasegawa connected to my machine with the Parsec client he could see a video feed of my desktop and hear the in game music and sound effects, in addition his USB controller showed up as a USB controller on my machine. He also remarked that there was virtually no lag between pressing a button on the controller and having his character move on screen.
If I had to step away for a sec though it’s like he was using a Cloud Gaming service, except it was his friend’s machine. Though the difference between this service and the others is it brought us together, even though we were physically distant. It was like sitting next to your friend on the couch and playing video games, even though the internet was making it possible, it felt like you were right next to each other.
Method Two: Rent a Machine in the Cloud
A few years ago I was lucky enough to be given access to a Cloud GPU Virtual Machine provided by Linode. This allowed me to install an OS and see if the machine could be used for Cloud Gaming. The results ended up being very successful.
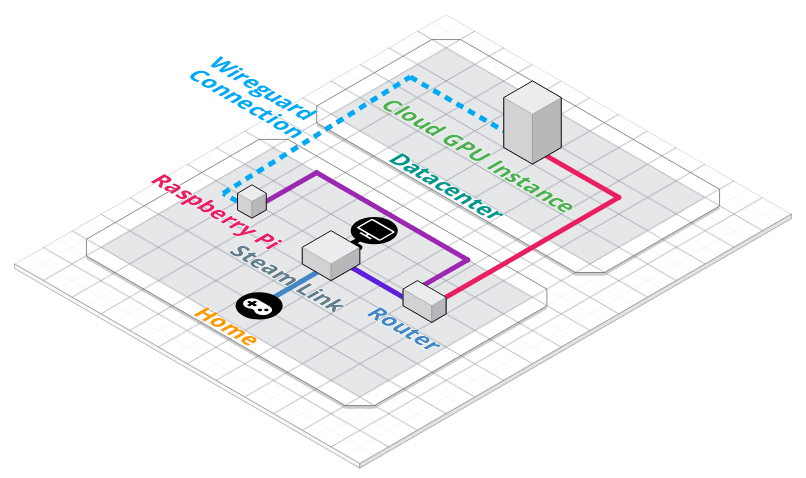
The local hardware that is needed in your home is a Steam Link (or a Raspberry Pi, or a computer running the steam link software) and a separate Raspberry Pi (or Linux machine).
The goal of all of this is to bring the virtual machine into your home and make the Steam Link think that Steam is running locally, even though it’s running in the Cloud.
For this method of the guide the “Server” is actually the RaspberryPI and the “Client” is actually the Cloud GPU instance you are renting. The Server and Client roles are what wireguard calls them and what you’re doing is basically bringing the Cloud GPU instance into your living room.
Step 1: Setup a wireguard server on the Raspberry Pi
I started out by following this guide https://www.stavros.io/posts/how-to-configure-wireguard/.
The official install docs actually worked well: https://www.wireguard.com/install/
In the guide they go over these steps for the public and private key on the server:
umask 077  # This makes sure credentials don't leak in a race condition.

wg genkey | tee privatekey | wg pubkey > publickey
Here is my wg0.conf file with the keys removed:
sudo cat /etc/wireguard/wg0.conf

[Interface]

Address = 192.168.2.1/24

PrivateKey = <Server Private Key>

ListenPort = 51820


PostUp = iptables -A FORWARD -i %i -j ACCEPT; iptables -A FORWARD -o
%i -j ACCEPT; iptables -t nat -A POSTROUTING -o eth0 -j MASQUERADE

PostDown = iptables -D FORWARD -i %i -j ACCEPT; iptables -D FORWARD -o
%i -j ACCEPT; iptables -t nat -D PREROUTING -i eth0 -j DNAT
--to-destination 192.168.2.2; iptables -t nat -D POSTROUTING -o eth0
-j MASQUERADE


[Peer]

PublicKey = <Client Public Key>

AllowedIPs = 192.168.2.2/32
replace the above eth0 with the main interface for the Raspberry Pi, it may be different
Then enable IP forwarding, as root:
echo 1 > /proc/sys/net/ipv4/ip_forward
Enable port forwarding on the router for the wireguard’s server’s IP address to 51820 This is where you have to go into your router’s setup and enable port forwarding, this part of the guide is difficult to describe because each router has a different page to set this up, usually it’s a webpage accessible on the local network.
Then test it out:
sudo wg-quick up wg0
There is more server config we’ll get to later
Step 2: Set up the Client
The Cloud GPU instance was running Ubuntu 18.10 when I set this up, which is now EOL, but a recent version should work the same.
sudo apt update

sudo apt install ubuntu-unity-desktop build-essential x11vnc

wget http://us.download.nvidia.com/XFree86/Linux-x86_64/430.14/NVIDIA-Linux-x86_64-430.14.run

chmod +x NVIDIA-Linux-x86_64-430.14.run

./NVIDIA-Linux-x86_64-430.14.run --compat32-libdir /opt
Enter this into /etc/X11/xorg.conf
# nvidia-xconfig: X configuration file generated by nvidia-xconfig

# nvidia-xconfig:  version 430.14


Section "ServerLayout"

    Identifier     "Layout0"

    Screen      0  "Screen0"

    InputDevice    "Keyboard0" "CoreKeyboard"

    InputDevice    "Mouse0" "CorePointer"

EndSection


Section "Files"

EndSection


Section "InputDevice"

    # generated from default

    Identifier     "Mouse0"

    Driver         "mouse"

    Option         "Protocol" "auto"

    Option         "Device" "/dev/psaux"

    Option         "Emulate3Buttons" "no"

    Option         "ZAxisMapping" "4 5"

EndSection


Section "InputDevice"

    # generated from default

    Identifier     "Keyboard0"

    Driver         "kbd"

EndSection


Section "Monitor"

    Identifier     "Monitor0"

    VendorName     "Unknown"

    ModelName      "Unknown"

    Option         "DPMS"

EndSection


Section "Device"

    Identifier     "Device0"

    Driver         "nvidia"

    VendorName     "NVIDIA Corporation"

    BoardName      "Quadro RTX 6000"

    BusID          "PCI:0:3:0"

EndSection


Section "Screen"

    Identifier     "Screen0"

    Device         "Device0"

    Monitor        "Monitor0"

    DefaultDepth    24

    Option         "AllowEmptyInitialConfiguration" "True"

    SubSection     "Display"

        Virtual      1920 1080

    EndSubSection

EndSection
The Specific important section is the “Screen” section.
You can replace abe with your name below
adduser abe
then reboot the Cloud GPU Instance once it comes back up, log in and run this:
screen

sudo x11vnc -storepasswd $&*^(SuperSecretPassword1234PleaseChange&#^@$
 /etc/x11vnc.pass

/usr/bin/x11vnc -xkb -forever -auth /var/run/lightdm/root/:0 -display
:0 -rfbauth /etc/x11vnc.pass -rfbport 5900 -bg -o /var/log/x11vnc.log
and you should be able to connect via vnc and install steam and download games.
Install wireguard according to the official docs
Private and public keys have to be generated on the client as well, here is the wg0 conf file:
cat /etc/wireguard/wg0.conf

[Interface]


PrivateKey = <Client Private Key>


ListenPort = 21841


# The addresses to bind to. Either IPv4 or IPv6. /31 and /32 are not supported.

Address = 192.168.2.2/24


[Peer]

PublicKey = <Server Public Key>


# The IP range that we may send packets to for this peer.

AllowedIPs = 0.0.0.0/0


# Address of the server

# Internet address

Endpoint = 123.456.789.100:51820


# Send periodic keepalives to ensure connection stays up behind NAT.

PersistentKeepalive = 25
then run:
sudo wg-quick up wg0
Step 3: Now back on the wg server (RaspberryPi)
sudo iptables -t nat -A PREROUTING -i eth0 -j DNAT --to-destination 192.168.2.2
This will make it so that everyone on the local network will think that your local IP address for the wireguard server is actually the Cloud GPU Instance, in my case my local IP was 192.168.1.101 but that line made the packets get forwarded to 192.168.2.2 and the pings from other machines showed up on the Cloud GPU Instance, this can be viewed with:
sudo tcpdump -i wg0
Now vnc might disconnect so you’ll have to reconnect to vnc at your local address in my case it was 192.168.1.101:5900 After logging into the window manager in VNC open up a terminal window and type:
steam -compat -nochatui -nofriendsui
Connect the steam link up and it should find the PC it might be called localhost as it was in my case, it will show up as a Linux steam host
Then I think I had to start the game up separately and then connect to it, this part of the UX was the most difficult to pin down and needed more work.
Thoughts on the second method
While not 100% ready for primetime, the technology does work. Wireguard worked flawlessly and was by far the most straightforward piece of the project. Xorg running on a headless display was the least straightforward. The proprietary NVIDIA driver worked well for me. The Linux Steam client was the most inconsistent in behavior. But finally once it was up and running the graphics were very good and the response time was imperceptible vs playing locally on a console.
One thing that might have made the Steam experience better was
installing Windows on the Cloud GPU Instance. I tried this but could
not get the Steam Link to connect to it in fullscreen mode because the
Cloud GPU Instance needed one of
these
to make the software think a monitor was connected. Linux did not have
this need and is able to trick it in software with the xorg config.
Final Thoughts
After comparing the two methods you might be able to see where I’m going with this. The outcome is to have a powerful desktop possibly with an equally powerful GPU with the special adapter connected, with Parsec and steam installed, so you or your friend can game from anywhere.
There might even be services on the horizon that work with something like XBox Game Pass which gives you access to all the games for a monthly fee. When you combine a monthly service for the hardware and the software it starts to make sense that everything can be rented. As opposed to the scenario above and the first method I’ve provided above where you own everything, the hardware, the software and the remote devices. Owning everything does come with its issues as well because if there’s a problem, there’s no one else to solve it.
The second method I’ve provided shows you how you might start to build your own Cloud Gaming company basing it off of Cloud GPU Instances that you can rent. One could build services on top of this that spin up installations on demand so people could take their entire library of games they already have and start playing them in the cloud.
The major game changer that has allowed all of this is internet speed. Writing this now in 2021 internet speed has picked up enough where Cloud Gaming is viable. In the past the latency was too high and the necessary broadband speeds were not fast enough, nor widely distributed enough. Now you can find a server farm or a friend’s house with broadband that has the speed necessary to do Cloud Gaming.
In addition everything that I’ve mentioned was within a 100 mile (161 km) radius to my Steam Link and desktop PC. In the future the extreme computing resources are going to move closer to where they are going to be consumed and where it makes sense geographically and population density wise. This is currently called Edge Computing in the industry, and what it means for the average gamer is Cloud Gaming resources closer to where they live.
The reason these hyper local computing resources are needed to combat latency is because of the speed of light. But going deep into Einstein’s relativity theory is a post for a different time.
https://en.wikipedia.org/wiki/OnLive